How to Calibrate Your TV and Monitor for Better Picture Quality
Get truer color, cleaner contrast, and smoother motion on your TV and monitor with this step-by-step guide to fast, accurate picture calibration.
Calibration Basics
Calibrating your TV or monitor means aligning what the screen produces with predictable standards so movies, games, and photos look natural and consistent across devices. The goal is not the brightest or most saturated image, but balanced detail, accurate color, and comfortable contrast that suits your room. Start by understanding how calibration differs by device: TVs are usually tuned for living rooms, while monitors favor desks and close viewing. Factory picture modes often push vivid colors and excessive sharpness, which can mask shadow detail and introduce halos. Select a mode that emphasizes accuracy, such as Movie, Cinema, or sRGB, to give yourself a neutral baseline. Panel technology matters too: IPS tends to offer stable viewing angles, VA usually delivers stronger native contrast, and OLED excels in black levels. Ambient light, wall color, and reflections also influence perceived gamma, brightness, and contrast. Think of it as dialing in the chain from source to screen so that creative intent is preserved and your viewing stays consistent across different content.
Prepare Your Environment
Great results start with preparation. Allow your screen to warm up so the backlight or pixels stabilize, and clean the panel gently to remove haze that can affect perceived clarity. Keep lighting consistent; a small, neutral bias light behind the screen reduces eye strain and helps you judge black levels more accurately, while bright lamps shining onto the panel can wash out shadow detail. Sit at a comfortable distance and center your eyes near the middle of the display to minimize angle-based color shifts. Reset picture settings and choose an accurate picture mode as a baseline, then disable extra processing like dynamic contrast, edge enhancement, heavy noise reduction, or aggressive motion smoothing while you calibrate. Use a solid connection and set your source to the display's native resolution and correct refresh rate. Prepare a handful of familiar scenes and simple test patterns (grayscale ramps, color bars, and near-black pluge patterns) so you can verify each adjustment step by step.
Brightness, Contrast, and Gamma
Set brightness first to establish true black without crushing near-black detail. A pluge pattern helps: you want the darkest bars to blend into black while slightly brighter bars remain just visible. Next, adjust contrast so the brightest whites don't clip; highlight detail in clouds, snow, or reflections should remain distinct. Confirm your RGB range setting: use limited range for typical TV sources and full range for many computer outputs, making sure both the source and display match to avoid washed-out or overly dark images. Then fine-tune gamma. A lower gamma can lift midtones for brighter rooms, while a higher gamma deepens shadows for dim environments; pick the curve that keeps midtones natural and gradients smooth. If your set has local dimming or an OLED limiter, keep their behavior in mind and perform SDR adjustments in a consistent lighting scenario. Validate changes with both dark scenes and bright highlights to ensure you retain detail at both ends.
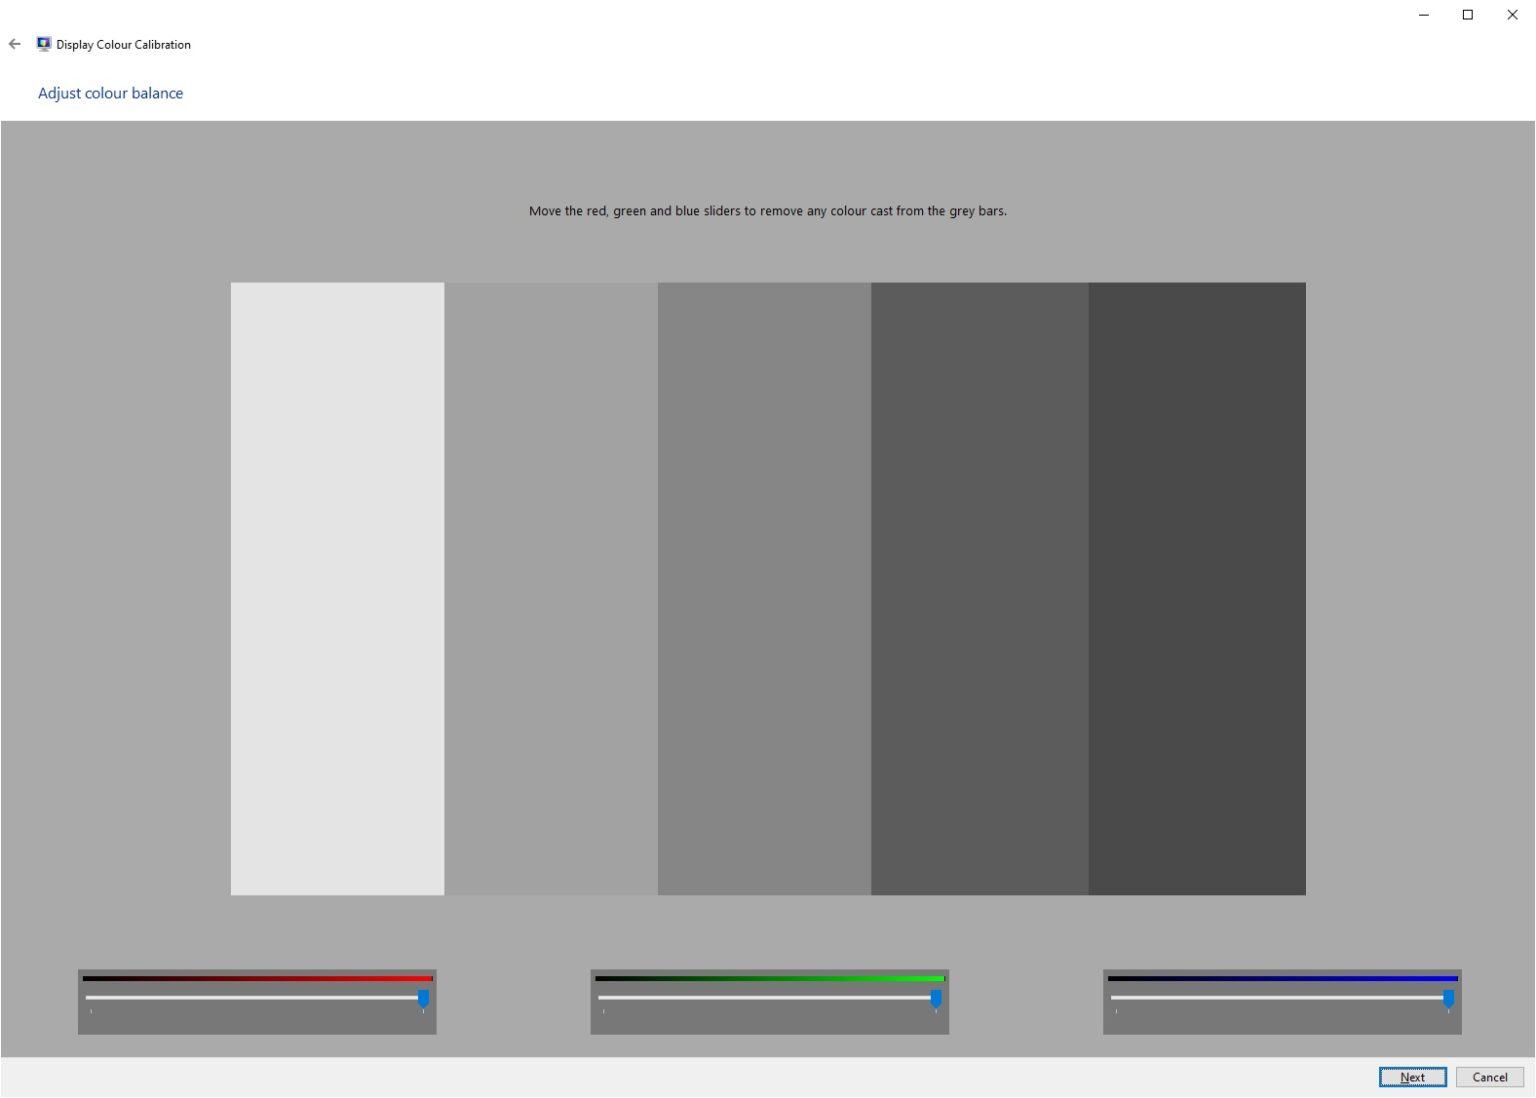
Color Temperature, White Balance, and Saturation
Accurate color begins with color temperature. Choose Warm or Neutral; Cool usually skews blue and makes skin tones look frosty. If available, set the display to an sRGB/Rec.709 or similar standard color mode for SDR content, which constrains wide-gamut screens from oversaturating everyday video and web images. Use color bars to balance saturation and tint so hues look vivid yet believable, avoiding neon tones or green/magenta shifts. Without a meter, keep advanced white balance controls conservative; a 2-point adjustment is safer than granular multi-point tuning. Evaluate natural references like skin tones, foliage, and textiles to spot unwanted color casts. Disable blue light or eye comfort filters while calibrating, since they alter the white point; if you prefer them at night, create a separate preset. On computers, pairing your adjustments with an appropriate ICC profile can further align apps and the OS with your display's capabilities, improving consistency across creative and everyday tasks.
Sharpness, Motion, and Scaling Controls
Excess sharpness often adds halos around edges and exaggerates noise. Reduce it until lines look crisp without glowing outlines; fine text and high-contrast graphics are good references. Set the aspect ratio to eliminate overscan, ensuring 1:1 pixel mapping so you see the entire image and precise detail. For clean sources, turn down heavy noise reduction and edge enhancement; they can smear texture and hide real detail. Keep resolution and scaling consistent, ideally at the panel's native resolution, and let one device handle scaling to avoid double-processing. For motion, balance blur reduction and judder controls to match your taste without creating the soap-opera effect. Sports and animation may benefit from modest smoothing, while films usually look best with minimal processing. Gamers should enable Game Mode or similar low-latency settings, and consider features like variable refresh rate carefully, as they trade some processing for responsiveness. Recheck your earlier adjustments after motion and scaling tweaks, since these can subtly alter perceived clarity.
HDR, Profiles, and Ongoing Verification
Treat SDR and HDR as separate calibrations. Ensure your source and inputs are set for full bandwidth so the display can access its complete color and luminance capabilities. In HDR, adjust tone mapping for a balanced presentation: avoid crushed highlights or raised blacks, and set local dimming to a level that preserves detail without pumping brightness. For monitors, using a colorimeter and software to create an ICC profile can yield highly accurate color; for TVs, store custom presets per input so different devices remain consistent. Keep two profiles for different environments, such as a bright-room preset and a darker viewing preset with a slightly deeper gamma. Validate with varied real-world content: natural landscapes, faces, night scenes, and animations to ensure uniform performance. Displays drift over time, so revisit settings periodically. Maintain the screen by keeping it clean, avoiding static images for long periods, and giving the panel time to warm up before critical viewing.